Purchase restoration and transfering FAQ

Transfer purchases between different platforms and app marketplaces.

To understand the license purchase system for using the Pro version, you must understand the main idea: there are 3 different applications, each of which is a separate legal entity with its own separate license:
1) Car Scanner ELM OBD2 for Google Play
2) Car Scanner ELM OBD2 for Apple AppStore
3) Car Scanner ELM OBD2 for Huawei AppGallery

When you buy a license from an app store (Google Play, Apple AppStore, Huawei AppGallery) you agree to the terms of this app store. Each app store policy states in some form or another that all purchases are valid only within that app store and if the app store is installed on your device. The app store acts as a technical means of copyright protection, in other words, it is the app store that checks and activates your license.
The conclusion follows from this: it is impossible to transfer purchases between different versions of the program.

If you purchased the application from Google Play, your license is valid only for the version installed from Google Play and if Google Play is available on your device. You will not be able to activate your purchase on the Huawei AppGallery or Apple AppStore version of Car Scanner.
If you purchased the program from Huawei AppGallery, your license is valid only for the version installed from Huawei AppGallery and if you have Huawei AppGallery on your device. You will not be able to activate your purchase on the Google Play or Apple AppStore version of Car Scanner.
If you purchased the program from the Apple AppStore, your license is only valid for the version installed from the Apple AppStore and if you have the Apple AppStore on your device. You will not be able to activate your purchase on the Google Play version of Car Scanner or the Huawei AppGallery.

General questions related to versions from Apple AppStore, Google Play, Huawei AppGallery:

1. I forgot/lost/changed my account. Is it possible to transfer the purchase to my new account.
No you can not. If you have lost access to your account, then you have lost access to all purchases that are associated with this account. I can’t help in solving this problem, because this is the scope of the app store. Regular developers do not have any technical ability to transfer purchases between accounts. You can contact app store support to regain access to your account.

2. I changed my phone and I no longer have the app store through which I bought the app. Can I transfer my purchase to another app store?
No you can not. It is the app store that provides confirmation, verification and activation of all your purchases.
Sometimes it is technically possible to install an app store on a new phone. For example, the Huawei AppGallery app store can be installed on almost any Android phone. On some phones without Google Play, it is possible to install Google and Google Play services.
So you have two possible solutions:
1) If it is technically possible: install on the new phone the application store through which the purchase was made and restore (activate) it.
2) Make a new purchase through the store that is installed on your new phone.

3. I don’t remember which version (through which app store) I bought. What should I do?
If you had an iPhone/iPad, then you could only make a purchase through the Apple AppStore. Your purchase is valid on iPhone/iPad only. Just use the same Apple ID in your iPhone/iPad settings and click the “Restore purchases” button on the in-app purchases screen if the Pro version didn’t activate automatically.
If you had Android, you’ve it bought through Google Play or Huawei AppGallery. Try both markets.

4. I bought through Google Play, how can I restore my purchase?
Just use the same account and install the program from Google Play. The Pro version activates automatically, or you need to click the “Restore purchases” button on the purchases screen. If the purchase does not recover, here are the possible causes and solutions:
1) If you have multiple Google accounts in Android settings, you need to temporarily log out of all “extra” ones, leaving only the account that was used to purchase Car Scanner.
After that, activate the Car Scanner and you can log back into the rest of the accounts.
2) If something is blocking the program’s access to the license verification server, then allow access. Sometimes you need to install and activate any free VPN application.
3) Check if the date, time and time zone are correct in your phone settings.
4) Reinstall the application.
If none of these methods worked, then send me the order number (you can find it in the purchase confirmation email from Google Play, it always starts with “GPA”) and a screenshot of the error message when trying to restore the purchase. It is very important to send both. Instead of the order number, you can write the e-mail address of your

5. I bought through Huawei AppGallery, how can I restore my purchase?
You need to install Huawei AppGallery, log in to your AppGallery account, install Car Scanner from AppGallery (if there is an installed version of the program from another source, you must first uninstall it). The Pro version activates automatically, or you need to click the “Restore purchases” button on the purchases screen.

6. I bought through the Apple AppStore, how can I restore the purchase now?
You need to use the same Apple ID account in the AppStore on your iPhone/iPad, install the app from the AppStore. The Pro version activates automatically, or you need to click the “Restore purchases” button on the purchases screen.

7. I bought through the Apple AppStore, Google Play or Huawei AppGallery for a long time and suddenly the program switched to free mode.
Most likely you bought a subscription with a time limit and the period you paid for has expired. These subscriptions should auto-renew, but they don’t renew if the app store fails to charge you.

8. I can’t do ANYTHING! What should I do?
If you are unable to describe in detail what exactly you are not able to do, then you do not want my help.
I don’t help those who can’t do ANYTHING. Either you don’t get something specific and I help you solve this problem, or you are on your own. Harsh, but honest.

Bluetooth connection troubleshooting

An exhaustive list of possible connection problems with the ELM327 adapter.
Attention! This list only refers to the connection to the ELM327 device itself and does not cover connection problems with the vehicle ECU.

Issue #1. You have selected the wrong device in the program settings.
A very common problem is when users, instead of selecting the ELM327 adapter in the program settings, select some other device for connection (for example, a car multimedia system).
Solution: Go to Settings -> ELM327 Adapter -> tap the “Device Name” field to select the device and select your ELM327 adapter there. Usually the name of the adapter is OBDII or something related to the brand of the adapter (eg Viecar, V-Link, OBDLink).
Remember: the name of the adapter is never associated with either the brand of your car or the brand of your phone. Therefore, you do not need to choose “MyCar”, “Opel”, “Samsung” or “iPhone”!

Issue #2. You have multiple adapters with the same name and selected the wrong adapter. Adapters can have the same name (usually OBDII) but a different address. The connection is made not by the name of the adapter, but by its address. Therefore, if you have not selected the adapter that is connected to the car’s connector, the program will not be able to connect to it.
Solution: Go to Settings -> Adapter -> tap the “Device Name” field to select the device and select the correct ELM327 adapter there.
To eliminate possible confusion, I recommend removing all unnecessary adapters from Android settings.

Issue #3. You have selected the wrong connection type.
Solution: Most Android adapters work via “classic” Bluetooth, but sometimes there are adapters that work via Bluetooth LE (4.0).
IMPORTANT! Bluetooth LE is different from classic Bluetooth. These are fundamentally different ways of wireless communication.
If your adapter only supports classic Bluetooth, you must select the Bluetooth communication method.
If your adapter only supports Bluetooth LE (Kiwi 3, OBDLink CX), you must select the Bluetooth LE (4.0) communication method.
If your adapter supports both Bluetooth and Bluetooth LE, then on Android it is recommended to choose classic Bluetooth, but on iOS you have no choice and are forced to use Bluetooth LE anyway. Adapters that only support classic Bluetooth will not work on iOS. With one exception: OBDLink MX+ (they have a direct contract with Apple, so they were allowed).
The Bluetooth version on your phone does not matter.
Thinking that Bluetooth LE will be faster than Bluetooth is also a mistake.

Issue #4. Another program is occupying the communication channel with the adapter.
Solution: Disconnect and force quit another program. Sometimes this is not exactly a trivial task.
On iOS, you need to trigger a task switch and force close all other OBDII apps.
On Android this may not work. the program may leave behind a background service connected to the adapter, so it is better to use the shutdown methods that are in the program itself.

Issue #5. The adapter fell asleep / hung / turned off.
Solution: Remove the adapter from the socket and insert it again. If the adapter has a power button, make sure the adapter is turned on, otherwise press the button.

Issue #6. Freezing or glitches of the Bluetooth stack (drivers) on your phone/tablet.
Solution: Turn Bluetooth off and on. If it doesn’t help, restart your phone.

Issue #7. No rights to access Bluetooth.
Solution: Allow the app to access Bluetooth.
Android 6.0-11 (and some 12): Android Settings -> Applications -> Car Scanner -> Permissions -> “Location/Geolocation” but it’s true).
Android 12 and above: Android Settings -> Applications -> Car Scanner -> Permissions -> Nearby Devices
iOS: iOS Settings -> Privacy & Security -> Bluetooth -> enable Car Scanner there

Issue #8. You have not enabled Bluetooth or you have not enabled the adapter.
If Bluetooth is turned off on your phone, you need to turn it on.
If your adapter has a power button, then you need to press it to turn it on.

Issue #9 (Android only): No permissions to access Bluetooth.
In addition to the permissions described in issue #7, there is another permission to access Bluetooth, which is not displayed anywhere and is automatically given to the program by the operating system at the time of installation. But sometimes, the Android OS doesn’t. Just a system glitch during the installation of the program and as a result, the program cannot use Bluetooth.
Solution: reinstall the program.

Issue #10. The adapter is dead. This is the most common case!
This happens much more often than you think. Therefore, if none of the above reasons helps, you just need to buy a new adapter.

BONUS. What to do if the Car Scanner does not see the adapter at all.
Solution: This problem can have various causes.
Reason 1: You chose the wrong connection method. For example, your adapter only supports classic Bluetooth, and you have selected Bluetooth LE (4.0). In this case, read the solution to problem #3 carefully.
Cause 2: The adapter is busy with another program.
Read the solution to problem #4 carefully.
Reason 3: not enough rights.
Read the solution to problem #7 carefully.
Reason 4: The adapter is frozen.
Read the solution to problem #5 carefully.
Reason 5: Bluetooth on the phone is frozen / glitched.
Read the solution to problem #6 carefully.
Reason 6: The adapter has died.
Read the solution to problem #8 carefully.
Reason 7 (Android only): Starting with Android 6 and above, in order to find new devices (Bluetooth LE devices are always considered new), you need to enable geolocation.

Volkswagen, Audi, Skoda, Seat: платформа PQ26 2020-

List of PQ26 based cars:

Volkswagen Polo Sedan 2020-, Škoda Rapid 2020-

Available Coding & service features for PQ26-based cars:

Assistance

  • 1. Power steering support power
  • 2. Steering mode
  • 3. Steering mode selection activation
  • 4. Torque steering compensation (TSC)

Backup

  • 1. All units backup
    Creates full backup of all long coding and all adaptation values. Takes a very long time!
  • 2. Backup copy of unit 01
  • 3. Backup copy of unit 02
  • 4. Backup copy of unit 03
  • 5. Backup copy of unit 08
  • 6. Backup copy of unit 09
  • 7. Backup copy of unit 10
  • 8. Backup copy of unit 17
  • 9. Backup copy of unit 19
  • 10. Backup copy of unit 44
  • 11. Backup copy of unit 5F

Battery

  • 1. Battery capacity (Ah)
  • 2. Battery manufacturer
    Maximum length = 3 symbols
  • 3. Battery serial number
    Maximum length = 10 symbols
  • 4. Battery technology

Brakes (ABS, ESP, XDS, etc.)

  • 1. ASR system adaptation
  • 2. Brake disc drying
    Brakes are lightly applied automatically on regular intervals to keep the brake discs dry and ready for maximum braking
  • 3. Hill Hold Control activation
    HCC prevents roll-back
  • 4. Hill Hold control adaptation
  • 5. XDS (expanded electronic differential system) adaptation
    XDS system applies brakes to inside wheel to improve steering at high speed

Climate

  • 1. Front glass heater temperature threshold (C)
    Minimum step 0.5 C
  • 2. Front glass heater time before turning off (seconds)
    Minimum step – 40 seconds
  • 3. Rear glass heater temperature threshold (C)
    Minimum step 0.5 C
  • 4. Rear glass heater time before turning off (seconds)
    Minimum step – 40 seconds
  • 5. Remember last air recyrculation position (with Climate control)
  • 6. Remember last air recyrculation position (without Climate control)

Dashboard

  • 1. Display ECO/efficiency hints
  • 2. Display oil temperature
  • 3. Remove key warning
  • 4. Show free space in fuel tank in the dashboard
  • 5. Show lap timer
  • 6. Test pointers at engine start
  • 7. Time format (24/12)
  • 8. Units: Date format
  • 9. Units: Distance
  • 10. Units: Fuel consumption (gasoline/diesel)
  • 11. Units: Pressure
  • 12. Units: Speed
  • 13. Units: temperature
  • 14. Units: Time format (12/24)
  • 15. Units: Volume

Doors, Locking and Unlocking

  • 1. Driver door power window shut off delay after ignition was turned off (seconds)
    Maximum = 1275 seconds, step = 5 seconds
  • 2. Electric window on driver door comfort control using key fob
  • 3. Enable key open/close functions while engine running

Engine and powertrain

  • 1. Accelerator pedal high sensivity
    Not recommended for cars with cruise control
  • 2. Accelerator pedal response algorythm (variant 2)
    Better sensivity with “direct” value
  • 3. Throttle adaptation
    In some cases this procedure improves reaction on accelerator pedal for a period of time

Exterior lights

  • 1. Blink DRL with turn signal
    PQ26: Skoda Rapid
  • 2. Blink front DRL with turn lights
    PQ26, Confirmed on Skoda Rapid
  • 3. Blink front side lights with turn lights + front side lights turns off when low beam active
    PQ26: Skoda Rapid
  • 4. Blink rear side lights with turn lights
    PQ26: Skoda Rapid 2020+
  • 5. Coming home activation (trim with light sensors)
  • 6. Coming home activation (trim without light sensors)
  • 7. Coming home/Leaving home lights
  • 8. Corner function with front fog lights
    PQ26, Confirmed on Skoda Rapid
  • 9. Corner function: regulation
    ECE R119 – works when the steering wheel is turned and when the turn signal is turned on with a 1 second delay
    ECE R48 – only works when you turn the steering wheel
    FMVSS 517 108 – works when the steering wheel is turned and when the turn signal is turned on
  • 10. Corner function: upper speed threshold
    Maximum speed threshold for corner lights activation. Minimum step = 0.5 km/h
  • 11. Dimm rear side lights with turn lights (Audi style)
    PQ26: Skoda Rapid 2020+
  • 12. Disable license plate light when tailgate is opened
  • 13. DRL: DRL menu item in Multimedia system (MMI)
  • 14. DRL: Turn off DRL when parking brake activated
  • 15. DRL: Turn off when light switch in off position
    DRL = Daytime running lights
  • 16. Emergency braking lights
  • 17. Front side light dimming when turn signal blinking
    PQ26: Skoda Rapid
  • 18. LED DRL dimming when turn signal flashing
    PQ26: Skoda Rapid 2020 (NOT compatible with FULL LED headlights)
  • 19. LED DRL working with low beam
    PQ26: Skoda Rapid
  • 20. License plate: light type (LED/5W)
  • 21. Light sensor sensivity: turn on headlights later
    Warning! To revert settings back use Coding history!
  • 22. Limit the maximum number of simultaneously burning front lights to 2 types
    This is often used for stroboscope effect
  • 23. Rear side lights active with DRL (Skoda Rapid 2020-)
    PQ26: Skoda Rapid 2020-
  • 24. Rear side lights active with DRL (Volkswagen Polo Liftback 2020+)
    PQ26: VW Polo 2020-
  • 25. Stroboscope effect when blinking high beam + front fog lights
    PQ26: Skoda Rapid
  • 26. Stroboscope effect when blinking high beam + LED DRL
    PQ26: Skoda Rapid
  • 27. Stroboscope effect when blinking high beam + low beam
    PQ26: Skoda Rapid
  • 28. Turn lights: polite blinks count
    After applying this option reset light settings to factory defaults in car multimedia menu
  • 29. Turn on stop lights on the side of opened door
    PQ26: Skoda Rapid
  • 30. Turning on side direction indicators when opening the boot
    PQ26: Skoda Rapid
  • 31. US-style sidelight with turn signals
    PQ26: Skoda Rapid
  • 32. US-style sidelight with turn signals (only when light switch in side lights position)
    PQ26: Skoda Rapid

Feedback signals

  • 1. Acoustic feedback: activation or deactivation global setting
  • 2. Acoustic feedback: duration when using signal horn
  • 3. Acoustic feedback: menu in MMI
  • 4. Acoustic feedback: use signal horn
  • 5. Acoustic feedback: when locking
  • 6. Acoustic feedback: when second close command
    Quittierton bei zweitem ZV-ZU-Befehl
  • 7. Acoustic feedback: when unlocking
  • 8. Confirmation sound when locking and unlocking central lock
  • 9. Optical feedback: use 3rd brake light
  • 10. Optical feedback: when comfort closing windows
  • 11. Optical feedback: when locking

Interior lights

  • 1. Turn on interior light when tailgate opened

Lighting adaptations

  • 1. 0 BLK VL B35
    Usually front left turn signal
  • 2. 1 BLK VR B23
    Usually front right turn signal
  • 3. 2 SL VL B22
    Usually front left side light
  • 4. 3 SL VRB36
    Usually front right side light
  • 5. 4 TFL LB43
    Usually front left DRL
  • 6. 5 TFL RB6
    Usually front right DRL
  • 7. 6 ABL LB44
    Usually low beam left
  • 8. 7 ABL RB5
    Usually low beam right
  • 9. 8 FL LB42
    Usually high beam left
  • 10. 9 FL RB7
    Usually high beam right
  • 11. 10
  • 12. 11 WARNBLK TASTER C54
  • 13. 12 NL LB40
    Usually left fog light
  • 14. 13 NL RB3
    Usually right fog light
  • 15. 14 LOCKUNLOCK61
  • 16. 15 SAFE LED C55
  • 17. 16 BLK SLC11
    Left side turn light
  • 18. 17 BLK SR A72
    Right side turn light
  • 19. 18 BLK HLA71
    Usually rear left turn light
  • 20. 19 BLK HRC8
    Usually rear right turn light
  • 21. 20 BR LA70
    Usually left stop-signal
  • 22. 21 BR RC8
    Usually right stop-signal
  • 23. 22 BR MC9
    Usually 3rd stop-signal
  • 24. 23 SL HLC7
    Usually rear left side light
  • 25. 24 SL HRA69
    Usually rear right side light
  • 26. 25 KZL HA60
    Usually number plate light
  • 27. 26 NSL A65
    Usually rear left fog light
  • 28. 27 KL58XS C67
    Terminal 58xs dimmer
  • 29. 28 RFL C3
    Usually rear left reverse light
  • 30. 29 KL30G A69
    Usually inside locker lights
  • 31. 30 INNENLICHT A68
    Usually foot light
  • 32. 31 AMBL 1C65
  • 33. 32 AMBL 2C64
  • 34. 33 AMBL 3C72
  • 35. 34 AMBL 4C71
  • 36. 35 LED Warnblinktaster C48

Long coding

  • 1. 01. Engine
  • 2. 02. Transmission
  • 3. 03. Braking system
  • 4. 04. Power steering
  • 5. 05. Authorization system for access and starting the engine
  • 6. 06. Front passenger seat
  • 7. 08. Heater and climate
  • 8. 09. Onboard supply control unit
  • 9. 09. Onboard supply control unit -> Subsystem 1 (Wipers/Rain sensor)
  • 10. 09. Onboard supply control unit -> Subsystem 2 (RLHS)
  • 11. 0E. Media player 1
  • 12. 10. Parking Assistant 2
  • 13. 11. Engine Electronics No. 2
  • 14. 13. Active cruise control
  • 15. 14. Email system Damping controls
  • 16. 15. Srs
  • 17. 16. Steering column
  • 18. 17. Dashboard
  • 19. 18. Additional heater
  • 20. 19. CAN Gateway
  • 21. 1B. Active steering
  • 22. 21. Energy Management 2
  • 23. 22. Four-wheel drive
  • 24. 23. Increased braking force
  • 25. 25. Immobilizer
  • 26. 26. Electric folding roof
  • 27. 28. Climate Control Panel
  • 28. 32. Differential lock electronics
  • 29. 34. Ride height control system
  • 30. 36. Driver seat adjustment
  • 31. 37. Navigation system
  • 32. 3C. Lane change assistant
  • 33. 3D. Special function
  • 34. 42. Driver door electronic equipment
  • 35. 44. Power steering
  • 36. 47. Acoustic system
  • 37. 51. Electric drive
  • 38. 52. Front passenger door electronics
  • 39. 53. Parking brake
  • 40. 55. Headlights corrector
  • 41. 57. Tv tuner
  • 42. 5F. Electronic Information System 1
  • 43. 65. TPMS
  • 44. 69. Trailer functions
  • 45. 6C. Rear view camera system var.1
  • 46. 6D. Boot lid
  • 47. 6F. Comfort system central module 2
  • 48. 6С. Rear view camera system var.2
  • 49. 71. Charger
  • 50. 75. Emergency Call and Communication Module
  • 51. 76. Parking assistant
  • 52. 77. Telephone
  • 53. 7F. Electronic Information System 2
  • 54. 94. Srs
  • 55. 95. Esp
  • 56. A5. Front Assistant A5
  • 57. BB. Rear door behind driver
  • 58. BC. Rear door behind passenger

Multimedia

  • 1. Access trip computer in multimedia when ignition turned off
  • 2. AM radio
    Enable or disable AM radio
  • 3. AUX input activation
    Enable or disable AUX input for multimedia system
  • 4. Confirmation of installation changes
    Used after updating firmware, parts, POI, etc. to remove error 1555
  • 5. Display comfort systems consumption in MMI
  • 6. Display driving school mode in MMI
  • 7. Eco driving statistics display (green/blue menu)
  • 8. Mirror link in motion speed threshold (MIB3)
    Use this to activate MirrorLink in motion
  • 9. MMI USB activation
  • 10. Rear view camera
  • 11. Region settings (part 1) [MIB3 Only!]
    Don’t use on MIB1 or MIB2
  • 12. Region settings (part 2) [MIB3 Only!]
    Don’t use on MIB1 or MIB2
  • 13. Restart mutltimedia system
    After applying some codings you need to restart your multimedia system for changes to take effect
  • 14. Show offroad screen in multimedia system (Swing-3)
    Compatibility: not tested yet
  • 15. Swing/Bolero startup screen
    NOT TESTED!
  • 16. Wireless connectivity for Apple CarPlay and Android Auto (MIB3)
    Use this to activate wireless connectivity for Apple CarPlay and Android Auto. MIB3 only!

Service and maintenance

  • 1. Distance since last mileage-dependent inspection (km)
  • 2. DSG adaptation (DQ200, DQ250, DQ500)
  • 3. Mass DTC clear in most of units
    This feature clears DTC codes in most of units in just one click (takes 1 second)
  • 4. Max. distance until next mileage-related inspection (km)
  • 5. Max. time until next time-dependent inspection (days)
  • 6. Maximum distance between service (km)
    Step = 100 km
  • 7. Maximum distance to service
    Step = 100 km
  • 8. Maximum time between service (days)
  • 9. Mileage since last service (km)
  • 10. Minimum distance between service (km)
    Step = 100 km
  • 11. Minimum time between service (days)
  • 12. Reset service interval reminder
  • 13. Reset value for next mileage-dependent inspection (km)
  • 14. Reset value for next time-dependent inspection (days)
  • 15. Time since last service (days)
  • 16. Time since last time-dependent inspection (days)

Service reminder reset

  • 1. Reset inspection service reminder
    One click solution to reset inspection service interval
  • 2. Reset oil service reminder
    One click solution to reset oil service interval

Sounds and alarm

  • 1. Activate anti-theft alarm system
  • 2. Alarm on door opening with ignition turned on
  • 3. Horn working when ignition turned off
  • 4. Seat belts alerts
  • 5. Seat belts alerts style

Tire pressure monitoring system (TPMS)

  • 1. Reset TPMS adaptation (for TPMS based on ABS sensors)

Wipers and washers (windshield, rear glass, headlights)

  • 1. Headlight washer duty duration
    Minimum step = 10 ms
  • 2. Headlight washer interval
    Headlight washer interval runs at X washes of windshield. To disable automatic front light washer, change this value to 0
  • 3. Light sensor sensivity customization
  • 4. Park windshield wipers after ignition turned off
  • 5. Rear fog lights turned on warning when reaching speed limit
    Minimum step = 1 km/h, set 0 to disable warning
  • 6. Rear wiper automatic function
  • 7. Rear wiper comfort function
  • 8. Stop wipers when opening hood
  • 9. Stop wipers when opening hood
  • 10. Teardrop mode (additional wipers pass) on the rear glass
  • 11. Teardrop mode (additional wipers pass) on the windshield
  • 12. Turn on headlight washer after holding washer lever for XX ms
    Minimum step = 10 ms
  • 13. Windshield wiper service position activation through menu option
    Compatibility depends on installed MMI device.
  • 14. Windshield wipers defrost position

Other

  • 1. Automatic close doors at 15 km/h and open them when key removing
  • 2. Automatically close driver window after locking car (only for MY2019+)
  • 3. Automaticaly lock/unlock doors (for trims without color multimedia system)
  • 4. Electric windows working when ignition turned off
  • 5. Front fog lights: turn on fog when reversing
  • 6. Start-stop function deactivation (temperature method)
  • 7. Start-stop function deactivation (voltage method)

WARNING!
1) Coding & Service requires good ELM327 with full command set support.
2) Coding compatibility may depend on your car trim level and control units versions.

Custom sensors (PIDs)

Car Scanner allows you add custom sensors (also known as “custom PIDs”) to get data, defined by your car manufacturer.

To create custom sensor you need to know at least 2 things:
1. How to make a request to ECU to get the data you need:
Command = Mode + PID,  e.g. 010C for engine RPM
Header = address where to send request, e.g. 7E0 for CAN 11bit protocol. You can leave header blank. In that case default functional header for current protocol would be used. Most of custom PIDs requires correct header!

2. How to decode received data: Formula (Equation).
To point at certain bytes in response use latin letters: A, B, C, D .. Z, AA, AB, .. AZ, BA, BB, .. BZ, … etc. , where letter A stands for 1st byte in response, letter B stands for second byte in response, etc.
Attention! Formula is case sensitive!
To determine first byte, Car Scanner skips some bytes in response from ECU: header bytes, data length, response to certain mode marker (e.g. mode 01 -> response marker 41) and PID id.
Example: request 010C (engine RPM) would give you response: 7E804410C0C9C, where Car Scanner would skip 7E804410C.
So we have only 0C9C data left.
Letter A would mean 0C, letter B would mean 9C

You can use mathematical operators like *, /, , +. Example: A+B
To change calculation order use brakets ( ), like: (A*256+B)/4
You can use floating point numbers in formula using dot “.”: e.g. A+13.54

Bitwise functions supported:
Bitwise unary complement: @~
Bitwise AND: @&
Bitwise exclusive OR: @^
Shift left: @<<
Shift right: @>>
Examples: A@<<16, C&7, etc.

Additional functions (funtion arguments should be always separated by “,“):
GetBit(A,N), where A – byte number, N – bit number, from 0 to 7
SIGNED(A), signed(A), Signed(A) – treat byte as signed (-128 .. 127)
ShortSigned(A,B) – treat 2 bytes as 16-bit signed value
And(A,B) – bitwise AND, same as A@&B
Shr(A,B) – bitwise shift right, same as A@>>B
Shl(A,B) – bitwise shift left, same as A@<<B
MAX(A,B) – returns maximum value from A and B
MIN(A,B) – return minimum value from A and B
abs(A) – return unsigned value, e.g. abs(-1)=1, abs(-123456)=123456, abs(123456)=123456
FLOAT32(A,B,C,D), float32(A,B,C,D) – returns IEEE 754 floating point value from 4 given bytes.
FLOAT64(A,B,C,D,E,F,G,H), float64(A,B,C,D,E,F,G,H) – returns IEEE 754 floating point value from 8 given bytes.
if(A,B,C) – logic function, if A=1, returns B, else returns C. You can use “=” or “<” or “>” for comparison.
Example: if(A>5;5;A).  If A greater than 5, return 5, else return A. With A=6 this would return 5. With A=3 this would return 3.
SetVar(key,value) – store in memory some value. Car Scanner has a key-value dictionary, that is shared for all pids. Key – any integer number, e.g. 0, 1, 2, 3, 9999. Value – any value, e.g. 45.24. Returns the same value.
SetVarOnce(key,value) – store in memory some value, ONLY if it is  not stored there yet (with the same key). Returns the same value.
GetVar(key,default_value) – get value from dictionary previously set by SetVar or SetVarOnce. If value doesn’t exist in shared dictionary yet, returns default value. Example: GetVar(123,789.244) – returns value, stored in key 123, but if there’s no value with such key it returns 789.244
You can refer other sensors by 2 ways:
1) PID(ID) or pid(ID) – get other sensor value, where ID is sensor ID (you can check ID in Settings -> Sensors). Example: PID(5)
2) {name}, where name – is exact pid full name (case sensitive). Example: {Fuel temperature}

You can add commands, that would be executed BEFORE and after requesting PID (Start diagnostic command and stop diagnostic commands). This commands should be fully qualified ELM327 commands, separated by “;” or “,” or “\”. Example: ATCRA7E8,ATFCSH7E0,ATFCSD300000

Action PIDs.
Action PIDs are executed when you tap on them. Response is not decoded.
Example of usage: create custom action pid for some command, that starts a routine, like forced DPF regeneration.
Don’t forget, you still need to know header and command for that.

Name and Short name fields can be entered as you wish.
Minimum and maximum fields can be skipped.

Configuring Bluetooth connection on Android

First of all make sure, that you have OBDII ELM327 adapter with Bluetooth.

You should plug it inside the diagnostic socket in your car (known as “OBDII socket”) and turn on ignition or start the engine. If your adapter has a power button on it’s body – press it.

Step #1: Pair your phone/tablet with OBD2 adapter. If you have already done that – skip to Step #2.

WARNING! Depending on different Android versions, pairing may be done in some other way.

Open Android settings and locate Bluetooth section. Turn on Bluetooth and wait until your adapter would be discovered.

Usually it’s called “OBDII”, “obd2” or something like that. If it’s branded, it could be called as it’s brand (e.g. “Viecar”, “VLink”, etc.). Please, note, that it’s NEVER called like your car brand or “MY CAR” or something like that.

Tap on it to pair your phone/tablet with OBD2 adapter. Adapter would ask you for PIN-code.

If you don’t know PIN code, check your adapter documentation. Usually it’s “1234”, “0000”, “7890” or “1111”.

Step #2: Select adapter in Car Scanner.

Open Car Scanner and go to Settings (gear icon in the top-right corner)

Tap on “Adapter” (in old versions – “Connection”)

Select Connection type: Buetooth

Tap on “Select device” and you’ll see device selection screen.

Tap on your adapter’s name.

That’s all, now you have adapter selected and you need to go back and tap on big green “Connect” button.

Next time all you need to do is just tap on “Connect” button

Don’t forget to press power button on your adapter before connecting, if it has one.

Configuring Wi-Fi connection to ELM327 adapter

First of all make sure, that you have OBDII ELM327 adapter with Wi-Fi connection type. You should plug it inside the diagnostic socket in your car (known as “OBDII socket”) and turn on ignition or start the engine. If your adapter has a power button on it’s body – press it.

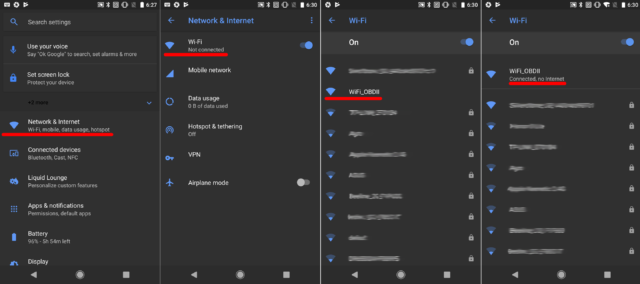
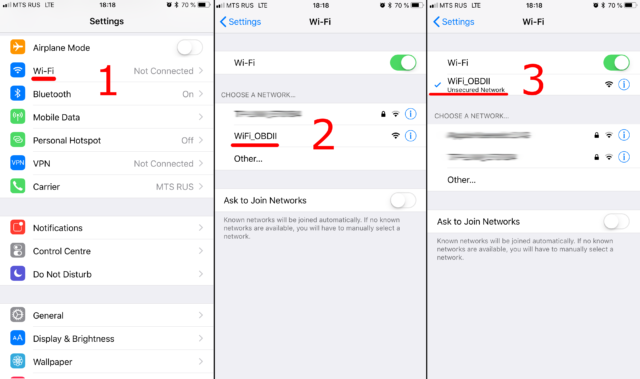
Step #1: Open your Phone/Tablet Wi-Fi settings (NOT Car Scanner settings) and turn on Wi-Fi.

Locate Wi-Fi network, created by ELM327 OBDII adapter and connect to it.

Usually it’s called “OBDII”, “OBD2”, “WIFI_OBDII” or something like that. Sometimes it’s name has something familiar with your adapter brand (e.g. VGate adapters usually have “VLINK” network name).

Most of adapters doesn’t require password for WiFi network, but if your adapter requires that – follow documentation that comes with your adapter.

Please, note, that it’s NEVER called like your car brand.

iOS
Android

Step #2. Car Scanner setup.

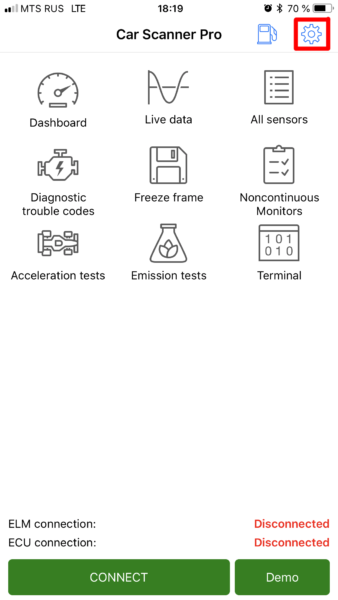
Open Car Scanner and go to Settings (gear icon in the top-right corner).

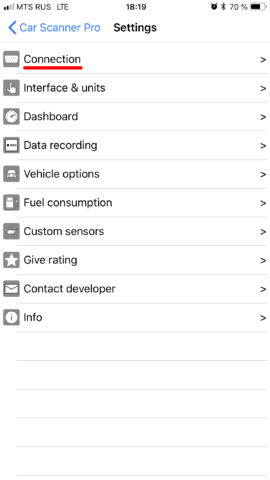
Tap on “Adapter” (in old versions – “Connection”)

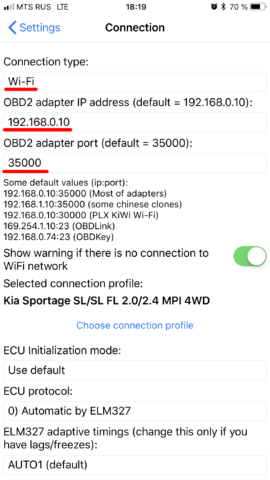
Select Connection type: Wi-Fi

Make sure that you have correct adapter IP address and port. For most cases it’s IP address is 192.168.0.10 and port is 35000, but some adapters have different settings, so you should check documentation that comes with your adapter.

That’s all! Now all you need to do is tap on big green “Connect” button that’s located.

When you want to connect next time, just make sure that you’re connected to OBD2 WiFi network and tap on “Connect” button.


 iOS Wi-Fi connection troubleshooting


Configuring Bluetooth 4.0 (LE) connection on iPhone/iPad

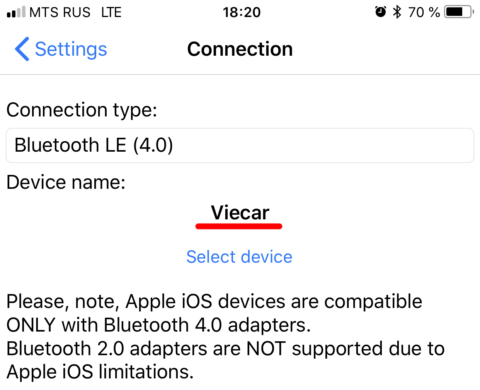
First of all, make sure that you have an OBD2 ELM327 adapter that works via Bluetooth 4.0 (LE). Pay attention to the Bluetooth version! Apple iOS devices support only Bluetooth 4.0 adapters. Older Bluetooth adapters are not supported. This limitation of the operating system Apple iOS. For more information, read article about choosing propper ELM327 adapter.

You need to insert the adapter into the diagnostic socket (also known as the OBD2 connector) and turn on the ignition or start the engine. If your adapter has a power button on the case, press it.

Make sure that Bluetooth is enabled on your iPhone / iPad.

Attention! Unlike Android devices, you don’t need to setup pairing with adapter in the iPhone / iPad system settings!

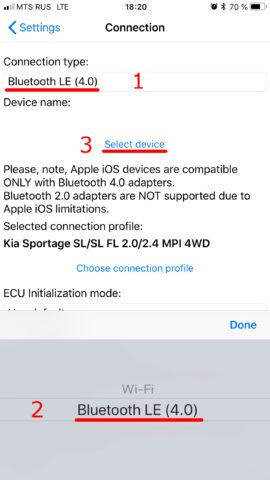
Step 1: Launch the Car Scanner and go to Settings (click on the gear icon in the upper right corner).

Step 2: Select “Adapter” (in old versions – “Connection”)

Step 3: Select “Connection Type”: Bluetooth 4.0 (LE)

Step 4: Click the “Select Device” button. You will be taken to the Bluetooth LE (4.0) nearby device search window.

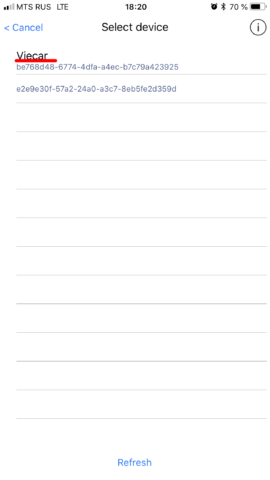
Step 5: Wait until your adapter is detected and click on it. If the adapter is not found within 5-10 seconds, click on the “Update” button to retry the search.

Usually the adapter is called “OBDII”, “obd2” or something like that. If this is a branded adapter, then its name can be similar to its brand (for example “Viecar”, “VLink”, etc.). Please note: adapters are never called as a car brand, “MY CAR” or something similar. And, the adapter always has a name. Devices without a name, only with the address of the form {…} are not adapters.

Attention! If after several attempts your adapter is not discovered, it means that it has an outdated (<4.0) version of Bluetooth that is not compatible with Apple iOS.

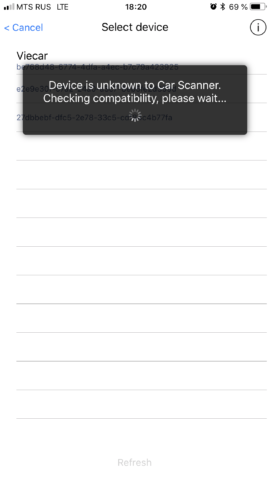
Step 6. Select your adapter in the list of detected devices and wait for the compatibility check with Car Scanner.

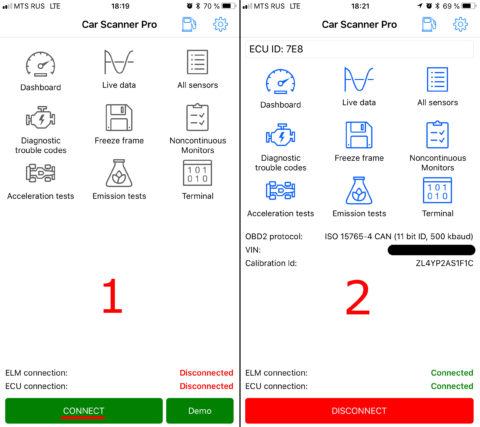
That’s all, connection setup is complete. Now you need to click on the big green “Connect” button on Car Scanner main screen.